The major task of IoT Creators is to provide a bridge of abstraction between IoT devices and IoT platforms and applications. IoT Creators provides connectivity (powered by Deutsche Telekom) and a server platform that receives the data from IoT devices over any of the popular IoT protocols, translates it to REST messages and pushes it to any third party application. To learn more, visit iotcreators.com and read the platform’s documentation.
The goal of this tutorial is to set up a connection between Efento sensor and IoT Creators platform, which will forward all the data received from the sensor to any third party application over REST.

Before you start
In order to make the integration work, you will need:
- IoT Creators SIM card (you can register and place your order here),
- Efento NB-IoT sensor with software 6.07 or newer,
- Smartphone with Android and Efento mobile application,
- Computer with Python 3.X installed (optional, if you want to use the demo Python code that receives the data over REST, parses it and saves in a database)
Efento NB-IoT sensor configuration
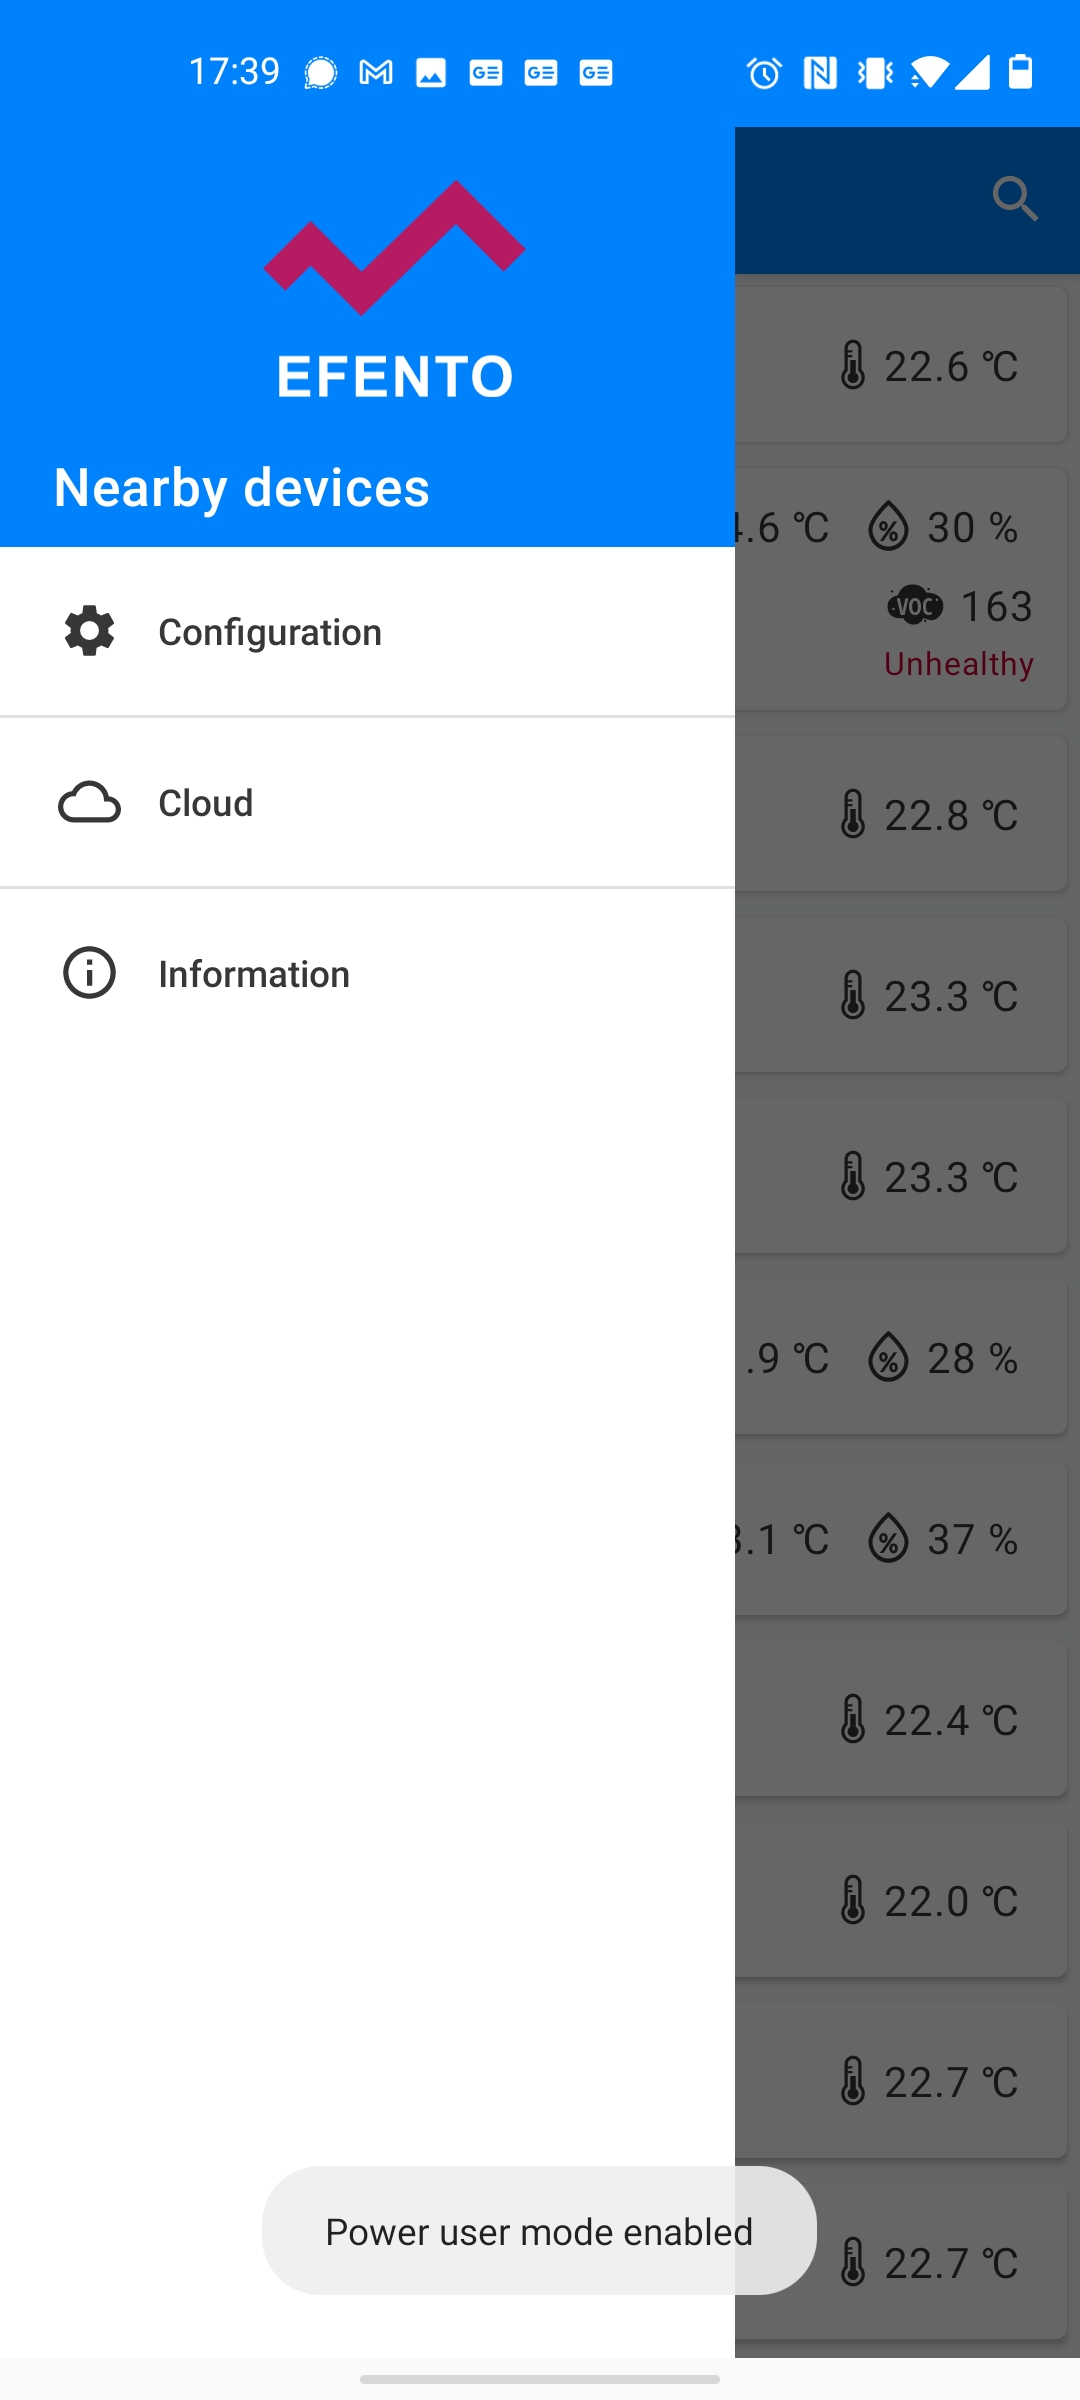
The whole configuration of the Efento sensor is done with a free mobile application for Android. Application can be downloaded from Google Play. Once you download and install the application select “Nearby sensors” mode and unlock the Power user mode – open the application menu and quickly tap the Efento logo five times. A toast with the message “Power user mode enabled” will show up at the bottom of the screen.
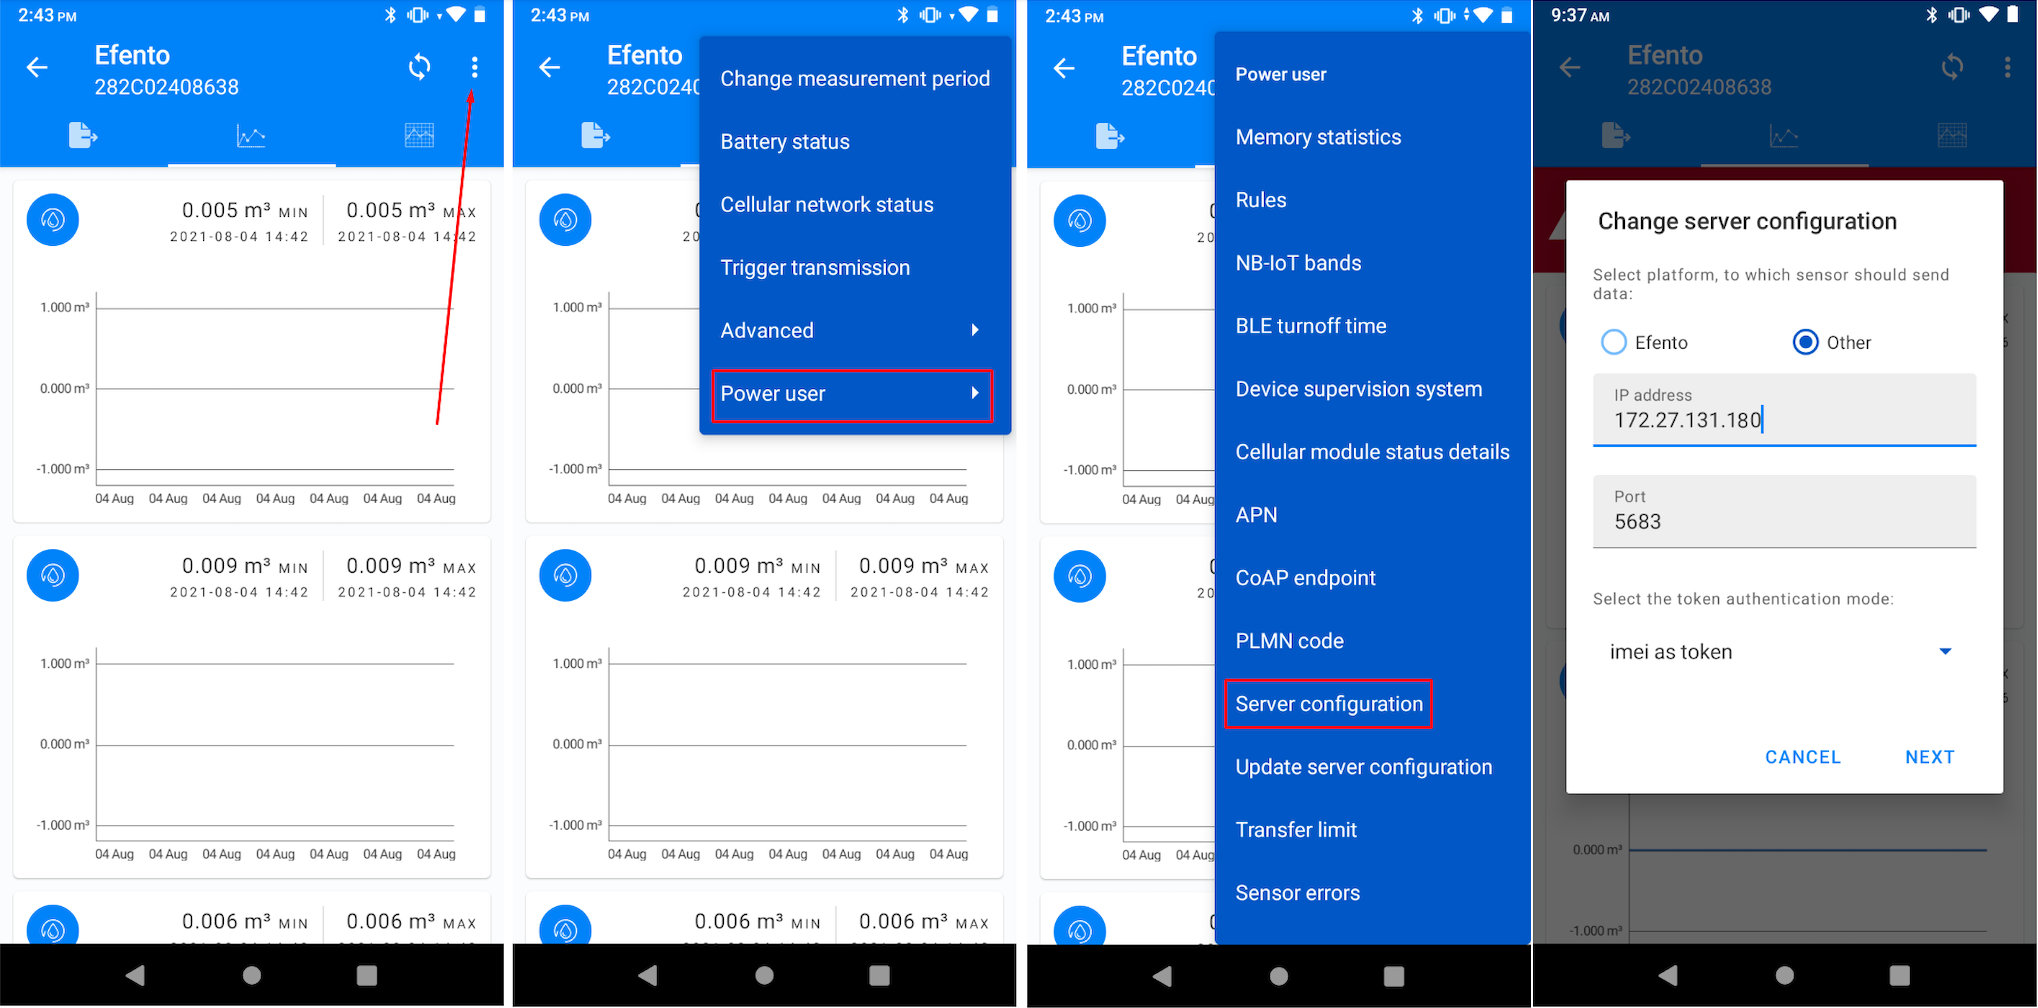
Connect with your device and set the server configuration. Open the Power user menu (three dots in upper right corner -> Power user) and select “Server configuration”. Select “Other” and set the IP address of the server to 172.27.131.100, and Port to 5683.
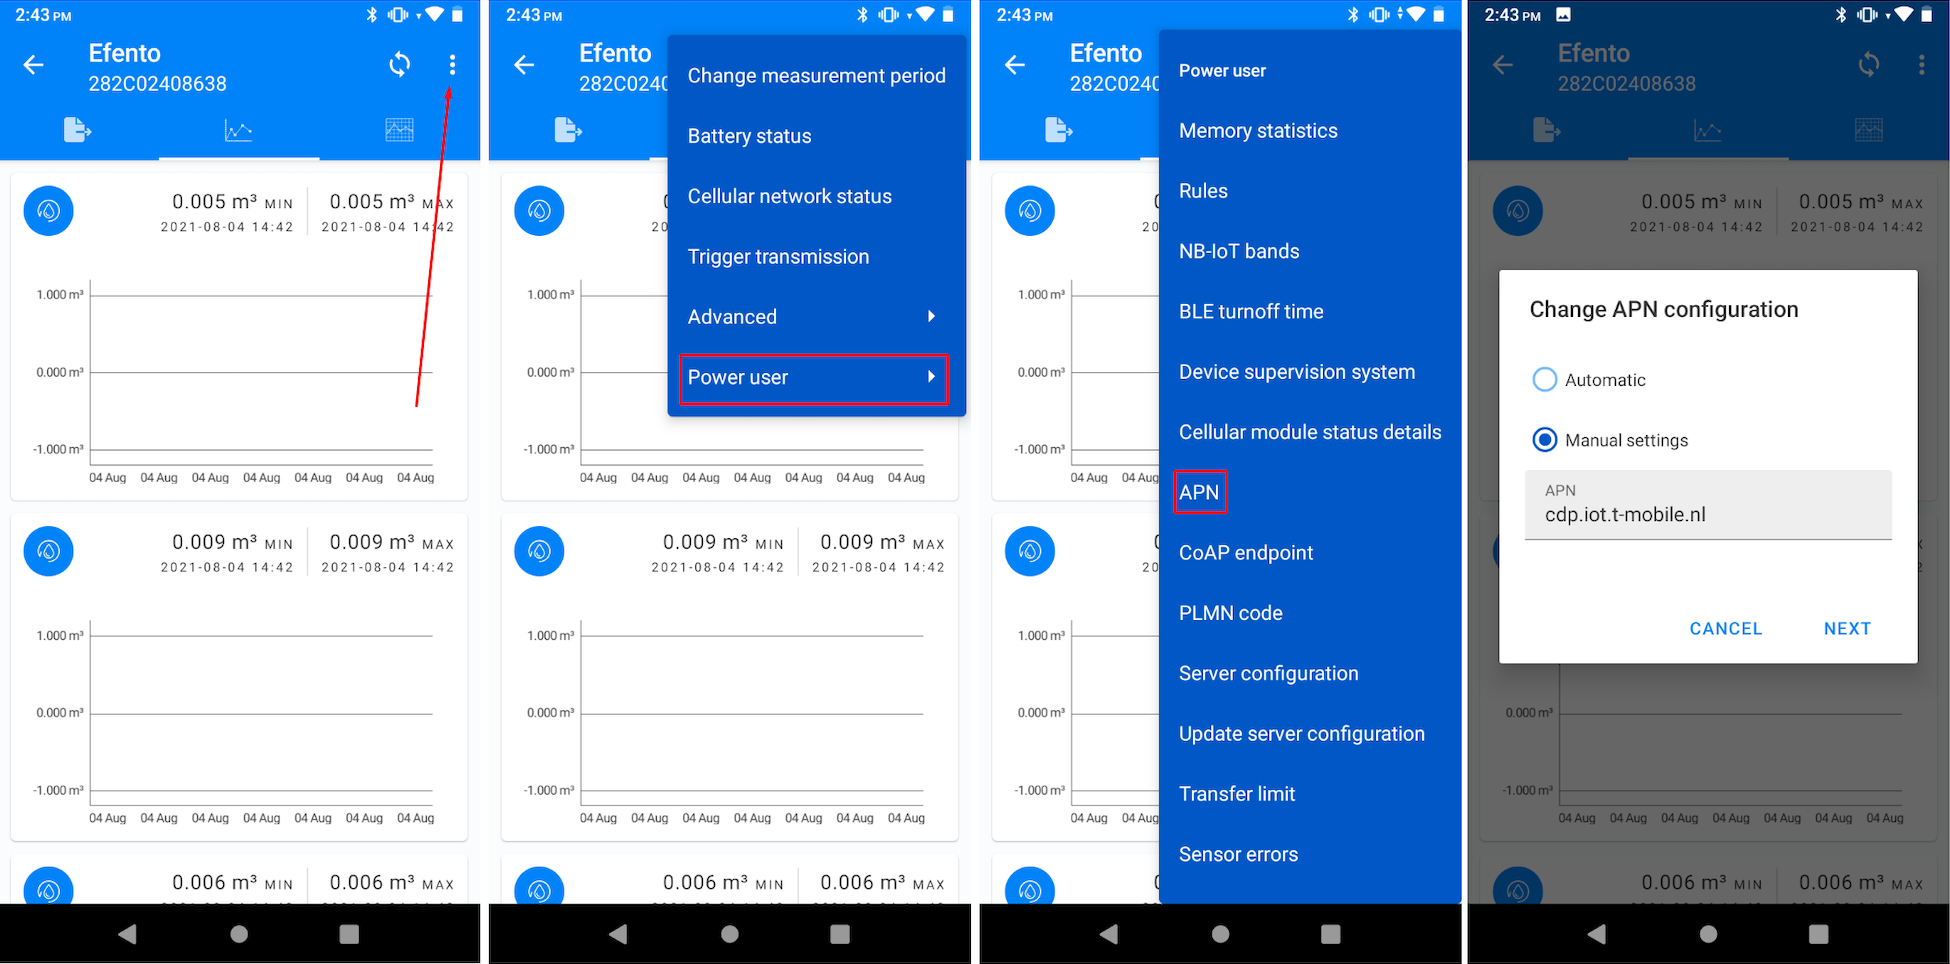
Set the APN to allow the device to send the data to the server. Open the Power user menu (three dots in upper right corner -> Power user) and select “APN” key in:
- ‘cdp.iot.t-mobile.nl’, if you use SIM card provided by IoT Creators
- ‘scs.telekom.tma.iot’, if you use SIM card from Magenta Austria
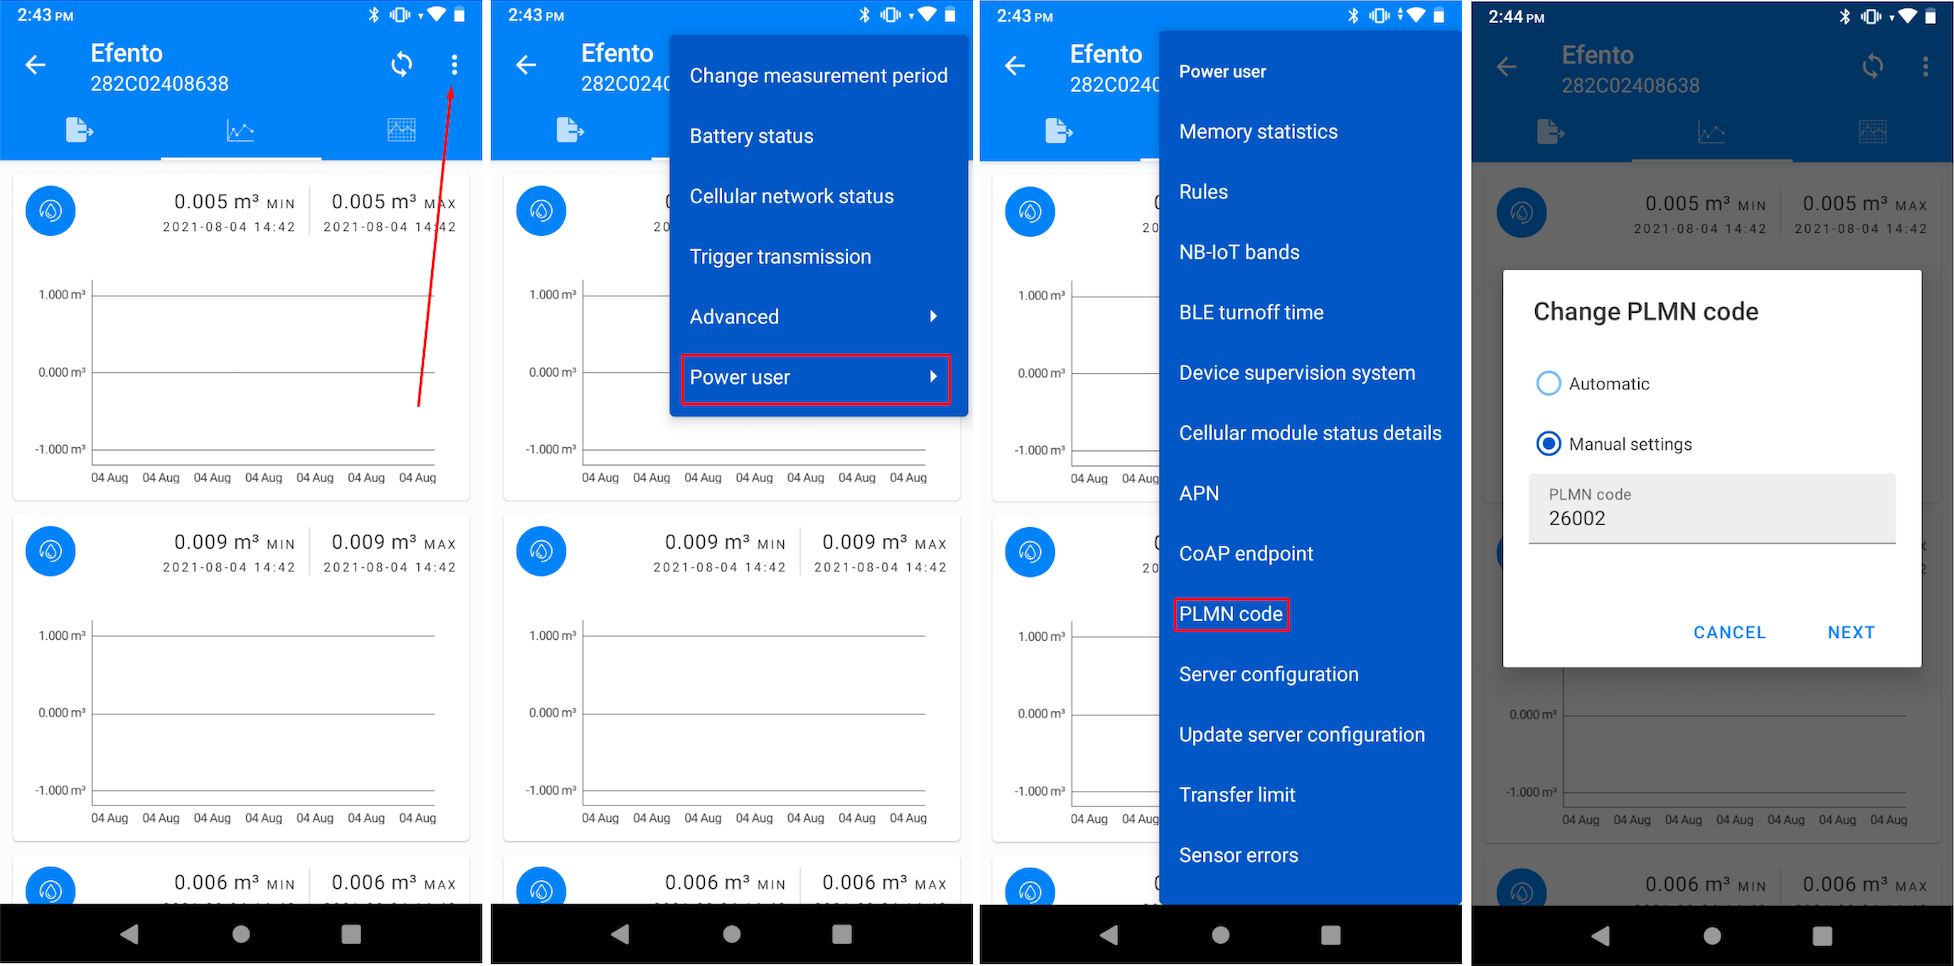
Set PLMN to the right value. Open the Power user menu (three dots in upper right corner -> Power user) and select “PLMN”. PLMN value depends on the country and the network used by the device. Configuration parameters you can find on the page IoT Configuration Parameters.
Setting up your application
Before registering an Efento sensor on IoT Creators, you need to set up the address, to which IoT Creators will forward the data. The application must listen to the data sent to it over rest and respond with a message with status code 201 to each message received from IoT Creators. You can find a sample Python script which listens to the data coming from IoT Creators, decodes the values and saves them in the PostgreSQL database here (Note! Before running the script setup PostgreSQL database and create a proper table).
IoT Creators configuration
In the next step you need to register Efento NB-IoT sensors on the IoT Creators platform. The easiest and the quickest way is to do it using the platform’s API. To register an EFENTO Sensor as a CoAP device with the IoT Creators API you need to use the API credentials which are given in the IoT Creators project in the tab “YOUR API CREDENTIALS”.

Register your application URL for the API user
This is the application, to which the IoT Creators platform will push all the incoming data from the sensors. You need to register the application URL because otherwise it will not be possible to create new devices via the API. Enter your server address in the ‘url’ filed in the request’s body. If your application requires any headers, you can add them in the ‘headers’ field.
REQUEST PUT https://api.scs.iot.telekom.com:443/m2m/applications/registration

REQUEST HEADERS: {
  'Content-Type': 'application/json',
  'Accept': 'application/json',
  'Authorization': 'Basic <base64(API-USER:API-USER-PASSWORD)>'
}

REQUEST BODY: {
    'url': 'https://your-app-address-goes-here',
    'headers': {
      'key1':'value1'
    }
}

RESPONSE BODY: {
    "msg": "Success",
    "code": 1000
}
Create standard CoAP device in IoT Creators
Create a new device with the same IMEI as the Efento sensor you have (“serialNumber” in the request body). To check your sensor’s IMEI connect to it open the settings menu (three dots in the upper right corner) and select “Cellular network status”. Optionally, you can assign the sensor to a group (“groupName” in the request body). You can add a list of key/value pairs as additional “customAttributes” to the device. Those key/value pairs are passed along with each message of the device to the configured application
REQUEST POST https://api.scs.iot.telekom.com:443/m2m/endpoints
REQUEST HEADERS: {
  'Content-Type': 'application/json',
  'Accept': 'application/json',
  'Authorization': 'Basic <base64(API-USER:API-USER-PASSWORD)>'
}
REQUEST BODY: {
  'serialNumber': 'IMEI:512668894698385', //IMEI of your Efento sensor
  'groupName': 'CON_0000002299',
  'protocol': 'HTTP',
  'additionalParams': {
    'adaptationLayerName': 'STDCOAP_TEST'
  },
  'address': '',
  'identifier': '',
  'customAttributes': {
    'deviceType': 'Efento'
  }
}

RESPONSE BODY: {
    "msg": "Device added successfully",
    "code": 3000
}
The device will be added to the device list on IoT Creators account. You can see it on the portal’s web.
Create a subscription for the CoAP device
REQUEST POST https://api.scs.iot.telekom.com:443/m2m/subscriptions?type=resources

REQUEST HEADERS: {
  'Content-Type': 'application/json',
  'Accept': 'application/json',
  'Authorization': 'Basic <base64(API-USER:API-USER-PASSWORD)>'
}

REQUEST BODY: {
  'subscriptionType': 'resources',
  'groupName': 'CON_0000002299',
  'deletionPolicy': 0,
  'resources': [
    {
      'conditions': {},
      'resourcePath': 'uplinkMsg/0/data'
    },
    {
      'conditions': {},
      'resourcePath': 'downlinkMsg/0/data'
    }
  ],
  'criteria': {
    'serialNumbers': ['IMEI:512668894698385'] //Your Efento sensor IMEI
  }
}

RESPONSE BODY: {
    "subscriptionId": "8974985d-fa8c-472d-8ae3-202e18143e1d",
    "msg": "Success",
    "code": 1000
}
After the steps described above, the sensor should connect to the network and send data to the IoT Creators platform. You can check it in ‘Cellular network status’ on ‘Efento’ Android application: the ‘Registration status’ field should have value ‘REGISTERED’ or ‘REGISTERED_ROAMING’, Communication status should have value ‘OK’ and sensor should get an IP address.

If the device has not registered to the network yet, trigger the transmission with Efento mobile application: connect to the sensor -> three dots in the upper right corner -> trigger the transmission.
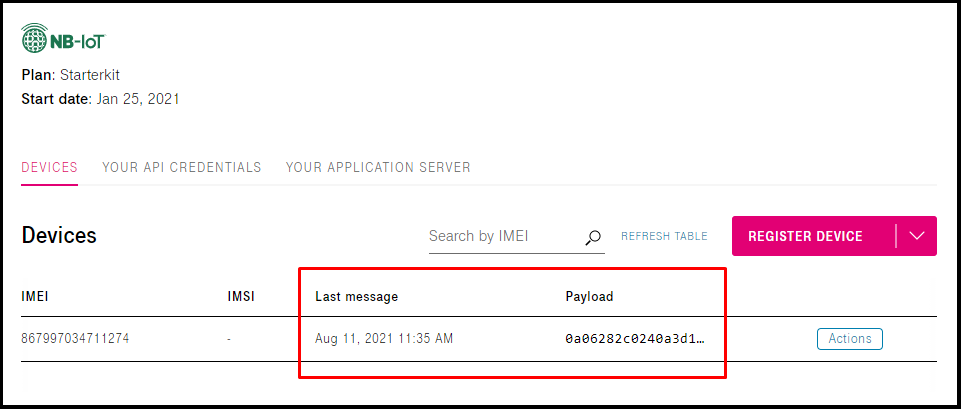
Additionally, you can check that the device has successfully connected with the network through IoT Creators web interface. Go to ‘DEVICES’ tab, select ‘Actions’ next to your device and ‘Show IP connection history’

When the first package of data is sent to the server, it will be shown on the device list (last message and payload) in the IoT Creators portal and the message’s payload will be forwarded to your application.