This tutorial will show you how to setup a simple http server with a database and configure Efento gateway to send the data to it. In this tutorial we are using Python, Flask and PostgreSQL database, but the same idea can be easily implemented in other programming languages / with different databases. Should you have any issues or questions, feel free to drop us a line at help.efento.io
Before you start
Before you start you will need to install and configure the following components:
- PyCharm or any Python 3 IDE,
- PostgreSQL database,
- Efento Gateway and Efento sensors
PostgreSQL database
Setting up the database
After downloading and installing PostgreSQL you will need to create the first database. This in one of the steps during the PostgreSQL installation. By default, the database will be created with the following credentials:
DATABASE_HOST = ‘localhost’;
DATABASE_USER = ‘postgres’;
DATABASE_PASSWORD = ‘Your password’;
DATABASE_NAME = ‘postgres’;
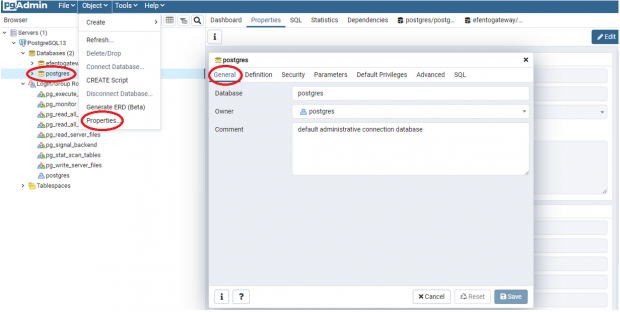
If you want to, you can change the names / credentials. Write them down, as they will be needed in the next steps. If you want to check database credentials, open pgAdmin in the PostgreSQL folder. Next open Object -> Properties -> General
Creating a table
To save the measurements coming from Efento Gateway in your database, you need to create a table. In this example, we are creating a very simple table to store all the data from the sensors, no matter what the sensor type. The table will have 5 columns, all of them of “text” type. Please note that this architecture of the database is only for the demonstration purposes. Database structure should be selected according to your project requirements.
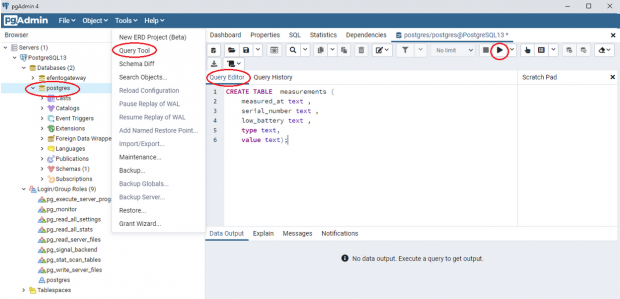
You can create the table manually, using pgAdmin’s interface or using a SQL query. In pgAdmin select your database, open Tools menu: Tools -> Query Tools. Copy the request below into the Query Editor and click Execute (▶) :
CREATE TABLE measurements (
    measured_at text ,
    serial_number text ,
    low_battery text ,
    type text,
    value text);
CREATE TABLE will create a new, initially empty table in the current database.
The table will be owned by the user issuing the command.
Python Server
Before you start
In order to make the server work, you will need:
- Flask – Flask is a micro framework used for development of web applications. If you want to learn more about Flask check out this website. You can install and import Flask in pyCharm IDE or using pip ($ pip install -U Flask)
- psycopg2 – one of the most popular PostgreSQL database adapter for Python. If You want to know more check out this website.
How it works?
Script we are going to write sets up http server. The server is constantly listening for data sent by Efento Gateway (gateway sends the data as JSON over REST. One message can contain multiple measurements from one sensor or measurements from multiple sensors. Once a new messages comes, server parses the data, saves it in the data base and returns “201” status code to the gateway. This means that the message has been successfully parsed and save in the database. If anything goes wrong (e.g. database is down), server will respond with “500” status code to gateway. In that case, gateway will retry to send the same data after a while.

Python code
You can copy the code below and save as a Python script (.py). Edit the database credential and run the code to start the server and listen for the data coming from Efento Gateway.
import psycopg2
from flask import Flask, request, Response, json, g
app = Flask(__name__)
# Enter your database host, database user, database password and database name
DATABASE_HOST = 'ATABASE_HOST';
DATABASE_USER = 'DATABASE_USER';
DATABASE_PASSWORD = 'DATABASE_PASSWORD';
DATABASE_NAME = 'DATABASE_NAME';
# Making the initial connection:
conn = psycopg2.connect(
dbname=DATABASE_NAME,
user=DATABASE_USER,
host=DATABASE_HOST,
password=DATABASE_PASSWORD
)
# Set up "/api/v2/measurements" endpoint, which will be receiving the data sent by Efento Gateway using POST method.
@app.route('/api/v2/measurements', methods=['POST'])
# To access incoming request data, you can use the global request object.
# Flask parses incoming request data for you and gives you access to it through that global object.
def respond():
data = request.json
record = []
response_handle = []
# iteration in list data/measurement
for measurement in data['measurements']:
# iteration in list data/measurement/params, creating a list of sensor parameters(measured_at,serial,battery) and measurement results
for param in measurement['params']:
record.extend([(measurement['measured_at'], measurement['serial'], measurement['battery'], param['type'],
param['value'])])
response_handle.append(measurement['response_handle'])
response = json.dumps(({'Y': response_handle, 'N': []}))
measurements = "INSERT INTO measurements(measured_at, serial_number, low_battery, type, value) VALUES (%s, %s, %s, %s, %s)"
with conn.cursor() as cur:
try:
# inserting a list of sensor parameters and measurement to table in PostgresSQL
cur.executemany(measurements, record)
conn.commit()
cur.close()
except (Exception, psycopg2.DatabaseError) as error:
print(error)
return Response(status="500")
return Response(response, status='201')
# Start the application on Your port.Default port 5000
if __name__ == "__main__":
app.run(host='0.0.0.0', port=5000)
Efento gateway configuration
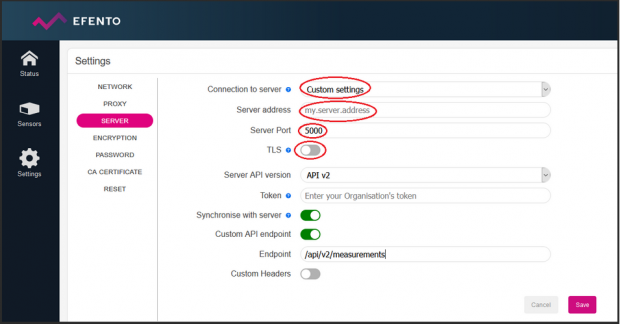
Log in to Efento Gateway’s web panel through your web browser. Navigate to Settings -> Server settings.
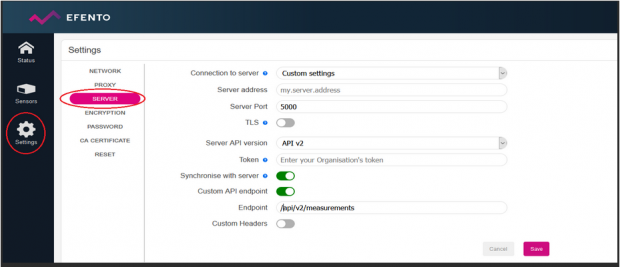
In the Connection To Server field select Custom Settings. Fill in the server address (either domain or IP of the computer / server which runs the Python script) in the Server Address field. Configure the Server port to 5000 and switch TLS off. Note! If TLS is switched off, the data sent by the gateway is not encrypted. For production deployments, you should upload your server’s certificate in the CA certificate tab and use encrypted communication (https).
Results
When you run the script, all the data coming form the gateway will be saved in the database. To view the measurements open pgAdmin 4, select your database, then open Tools > Query Tools.
Enter the request below into the Query Editor and select Execute (▶) :
SELECT * FROM measurements;
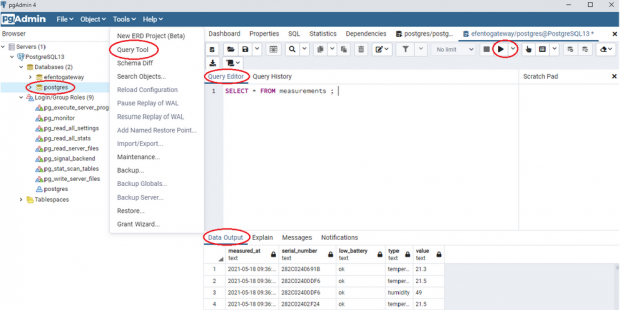
Data coming from Efento Gateway is saved in the database
Communication over secure HTTPS protocol – enabling TLS/SSL
TLS is a cryptographic protocol that provides end-to-end security of data sent between applications over the Internet. In order to secure the communication between Efento Gateway and the server, you can enable TLS on Efento Gateway. The communication between Efento Gateway and the server will be encrypted and only the server will be able to decrypt it. If you want to learn more about TLS and communication encryption check out this article.
Before you start:
- make sure you have installed OpenSSL (it comes with Git, so you probably already have it)
- register a domain and set it to point on the IP address of the server, to which the gateway will send the data (it is possible to issue a self signed certificate for an IP address, but this solution is not recommended)
Set up
In order to secure the communication between the gateway and your server application, you will need SSL (TLS) certificates. The most secure solution is to obtain a certificate signed by a Certification Authority. However, for the demonstration purposes, we will generate and self sign the certificates. The steps we will take:
- Generate a private key, that will be used to sign the certificates
- Create a signing request, to sign certificates used by the gateway and the server
- Generate a root certificate, which will be used by gateway. Sign the root certificate with the private key generated in step 1
- Upload the certificate to the gateway
- Generate server’s certificate (from the root certificate) and a pair of keys, which will be used to encrypt/decrypt the communication between the gateway and the server. Sign the server’s certificate with the private key generated in step 1
- Modify the Python code from the previous example to support HTTPS communication
- Configure the gateway to send the data using secure HTTPS protocol
Step 1: generate a private key
Open command line and navigate to a folder, where OpenSSL is located (Git\usr\bin). Run the following command:
openssl genrsa -out rootCA.key 2048
The command will generate a pair of keys, saved in the file named “rootCA.key”, located in the folder, where you run the command. This key will be used to sign the certificates generated in the further steps.
Step 2: Create a signing request
Use the following command:
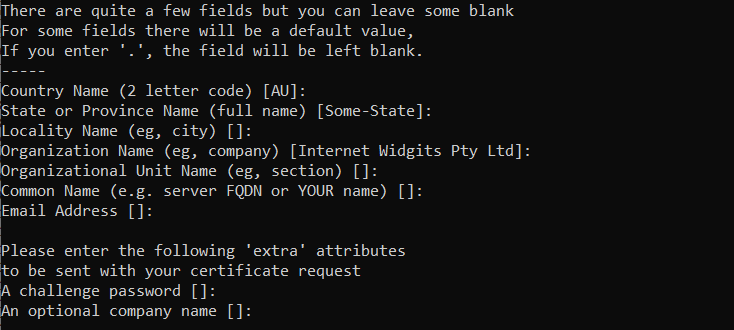
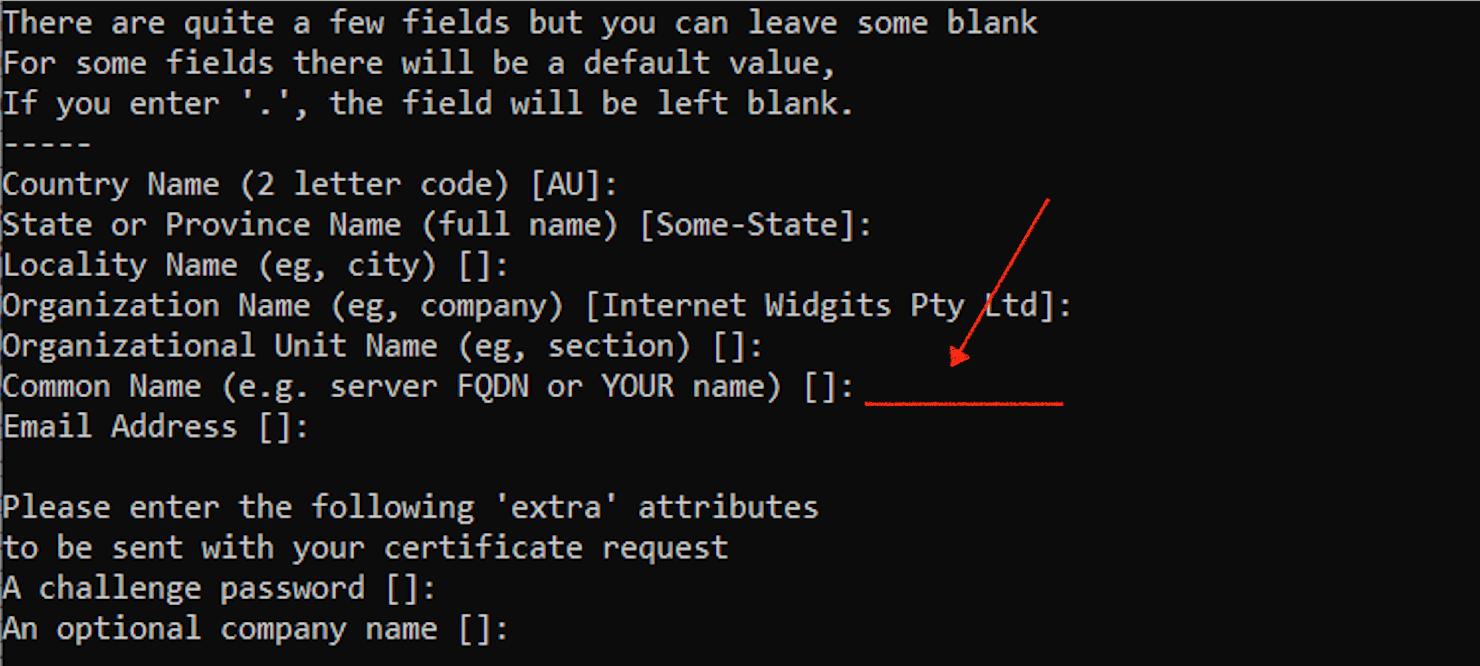
openssl req -new -nodes -key rootCA.key -out signing_request.csr
You will be asked to enter some information that will be incorporated into your certificate request (you can leave the fields blank). That information is what is called a Distinguished Name or a DN.
Step 3: Generate and sign root certificate
To create a self signed root certificate enter the following command:
openssl x509 -in signing_request.csr -out rootCA.pem -req -signkey rootCA.key -days 365
“-days” – parameter used to set certificate’s lifetime (if you don’t set it manually, the certificate lifetime will be set to 30 days by default).
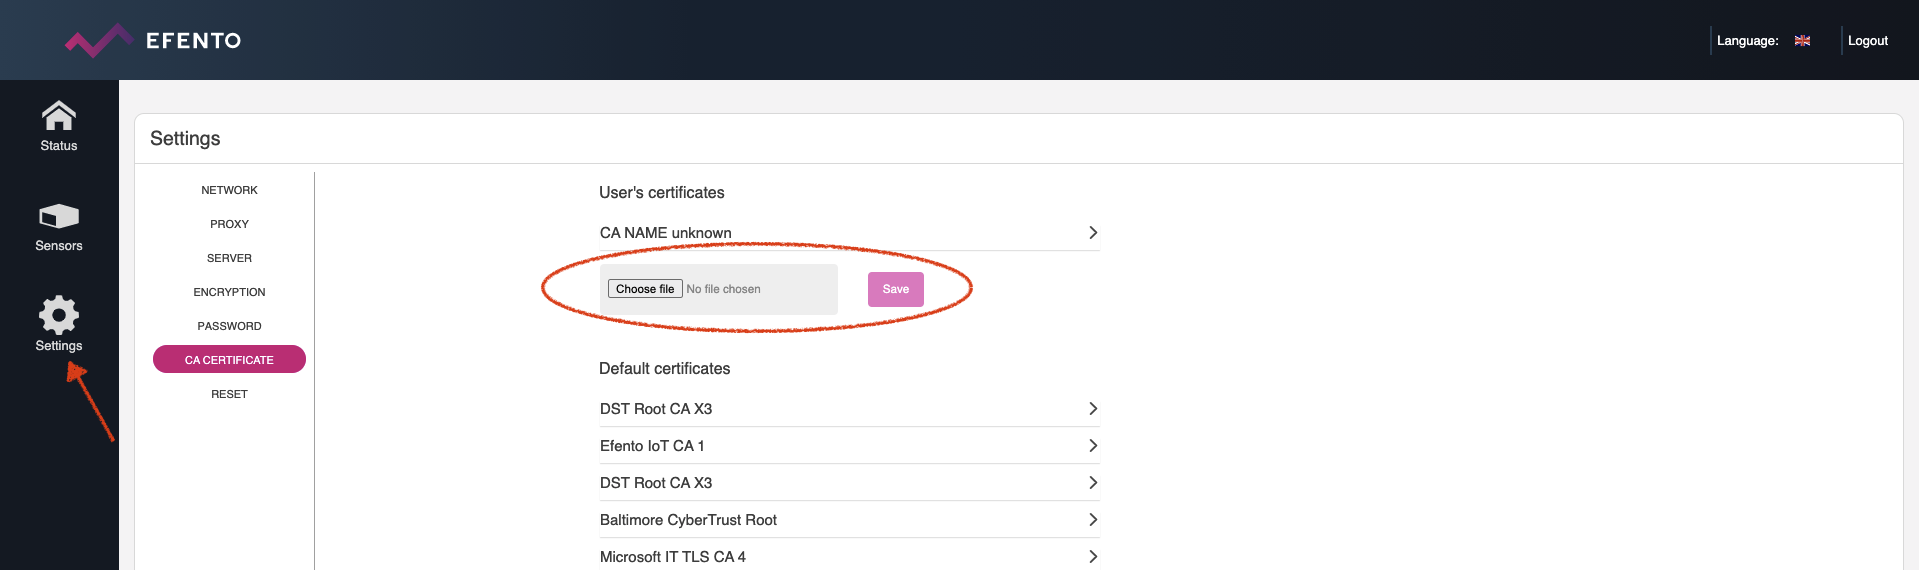
Step 4: Upload the certificate to the gateway
Login to Efento Gateway using your web browser and go to Settings -> CA certificate. Select the file you want to upload (rootCA.pem) and save the changes by clicking the “Save” button.
Step 5: Generate server’s certificate and keys
Now you can generate a pair of keys for the server and create a signing request for the server’s certificate.
openssl req -new -newkey rsa:2048 -nodes -keyout server.key -out server.csr
Important! Make sure you enter the domain address (or server’s IP) correctly!
Generate and sign server’s certificate:
openssl x509 -req -in server.csr -CA rootCA.pem -CAkey rootCA.key -CAcreateserial -out server.crt -days 365
Step 6: Modify the server application source code to support HTTPS
HTTPS communication is supported by Python’s Flask framework. First of all, you need to place the server’s certificate and pair of keys in the Python project folder. Modify the code of your application: all you need to do is to add “ssl context = (‘server.crt’, ‘server.key’)” in the app.run() call:
app.run(host='0.0.0.0', port=5000, ssl_context=('server.crt', 'server.key'))
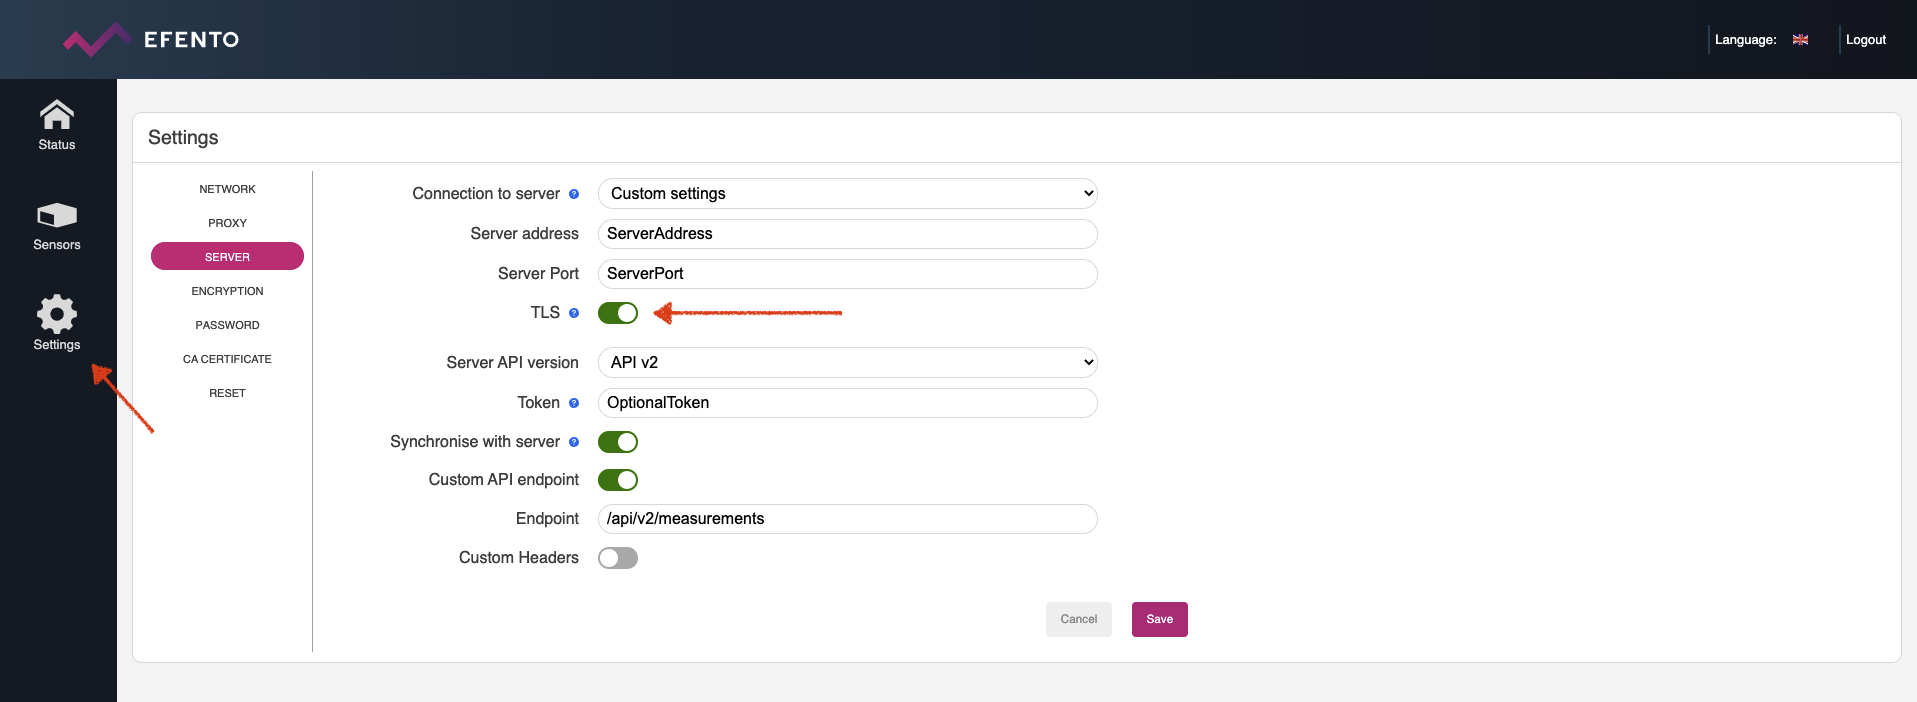
Step 7: Configure Efento Gateway to send the data over HTTPS
Login to Efento Gateway using your web browser and go to Settings -> Server. Enter the domain name in the “Server address” field, port number in the “Server Port”, enable TLS and save the changes with the “Save” button. From now on, the gateway will communicate with the server using secure HTTPS protocol.