This tutorial will show you how to set up a simple CoAP server, which receives the data from Efento NB-IoT sensors and saves it to a PostgreSQL database. In this tutorial we are using Python and PostgreSQL database, but the same idea can be easily implemented in other programming languages / with different databases. Should you have any issues or questions, feel free to drop us a line at help.efento.io
How does it work?
Efento NB-IoT sensors send the data in Protobuf format using CoAP protocol. This guarantees fast transmissions and small size of data, which results in up to 10 years battery life time. Moreover, as both CoAP and Protobuf are popular standards, it’s easy to integrate Efento wireless sensors with any cloud platform or custom application. To learn more about CoAP and Protobuf, please visit our Knowledge Library.
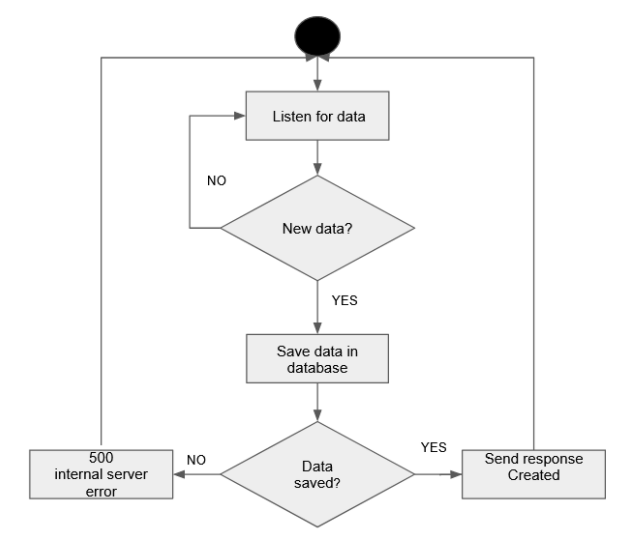
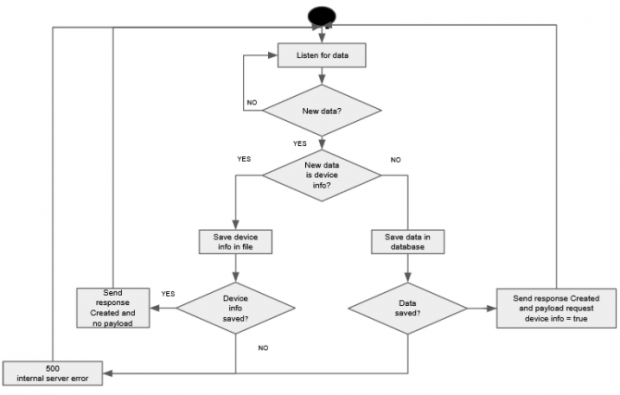
The Python Script we are going to write sets up the CoAP server. The server is constantly listening for data sent by Efento NB-IoT sensors. Once a new message arrives, the server parses the data, saves it in the PostgreSQL database and responds to the sensor with confirmation that the message has been received (code 2.01 “CREATED”). This means that the message has been successfully parsed and saved in the database. If anything goes wrong (e.g. database is down), the sensor will receive a response with code 5.00 “INTERNAL_SERVER_ERROR” . In that case, the NB-IoT sensor will retry to send the same data after a while.
Important! The response time from the server to the sensor should be as short as possible. In real-life integrations, the data received by the server should be pushed to a queue, and server should reply with 2.01 CREATED as quickly as possible. Saving the data to the database before responding to the sensor decreases the sensor’s battery life time.
On top of the messages with the measurements, the sensor sends three other types of messages:
- Configuration – these messages are sent by the sensor in order to synchronise its configuration with the server. On startup, the sensor will send its current configuration to the server. Later on, the message with sensor’s configuration is sent to the server any time the user reconfigures the device over Bluetooth or in case of any errors that sensor reports to the server (sensor sends the error codes). If the Configuration message contains an error code, it is confirmable and must be confirmed by the server. Otherwise, the Configuration messages are non-confirmable.
- Device info – message contains detailed radio and battery statistics of the device. This message is sent to the server on device’s startup or on server’s request. The first Device Info message is sent by the sensor on startup and requires confirmation from the server. The Device Info messages sent on server’s request are non-confirmable.
- Time – sensor’s request to the server used to obtain the current time. This message is sent by the sensor only in case when it is not able to receive the current time from the network. Time messages sent by the sensor to the server are always confirmable. The server returns current time stamp in the confirmation message’s payload.
In this example, we are going to log the Configuration and Device info messages sent by the sensor to a file. In real-life integrations, the Configuration and Device Info may be ignored, but the device must receive confirmation (ACK with code 2.01 “CREATED”) to each confirmable messages sent to the server.
Before you start
Before you start this, you will need to install and configure:
- Pycharm or any Python 3 IDE (Python version 3.10 or newer)
- PostgreSQL server
You will also need:
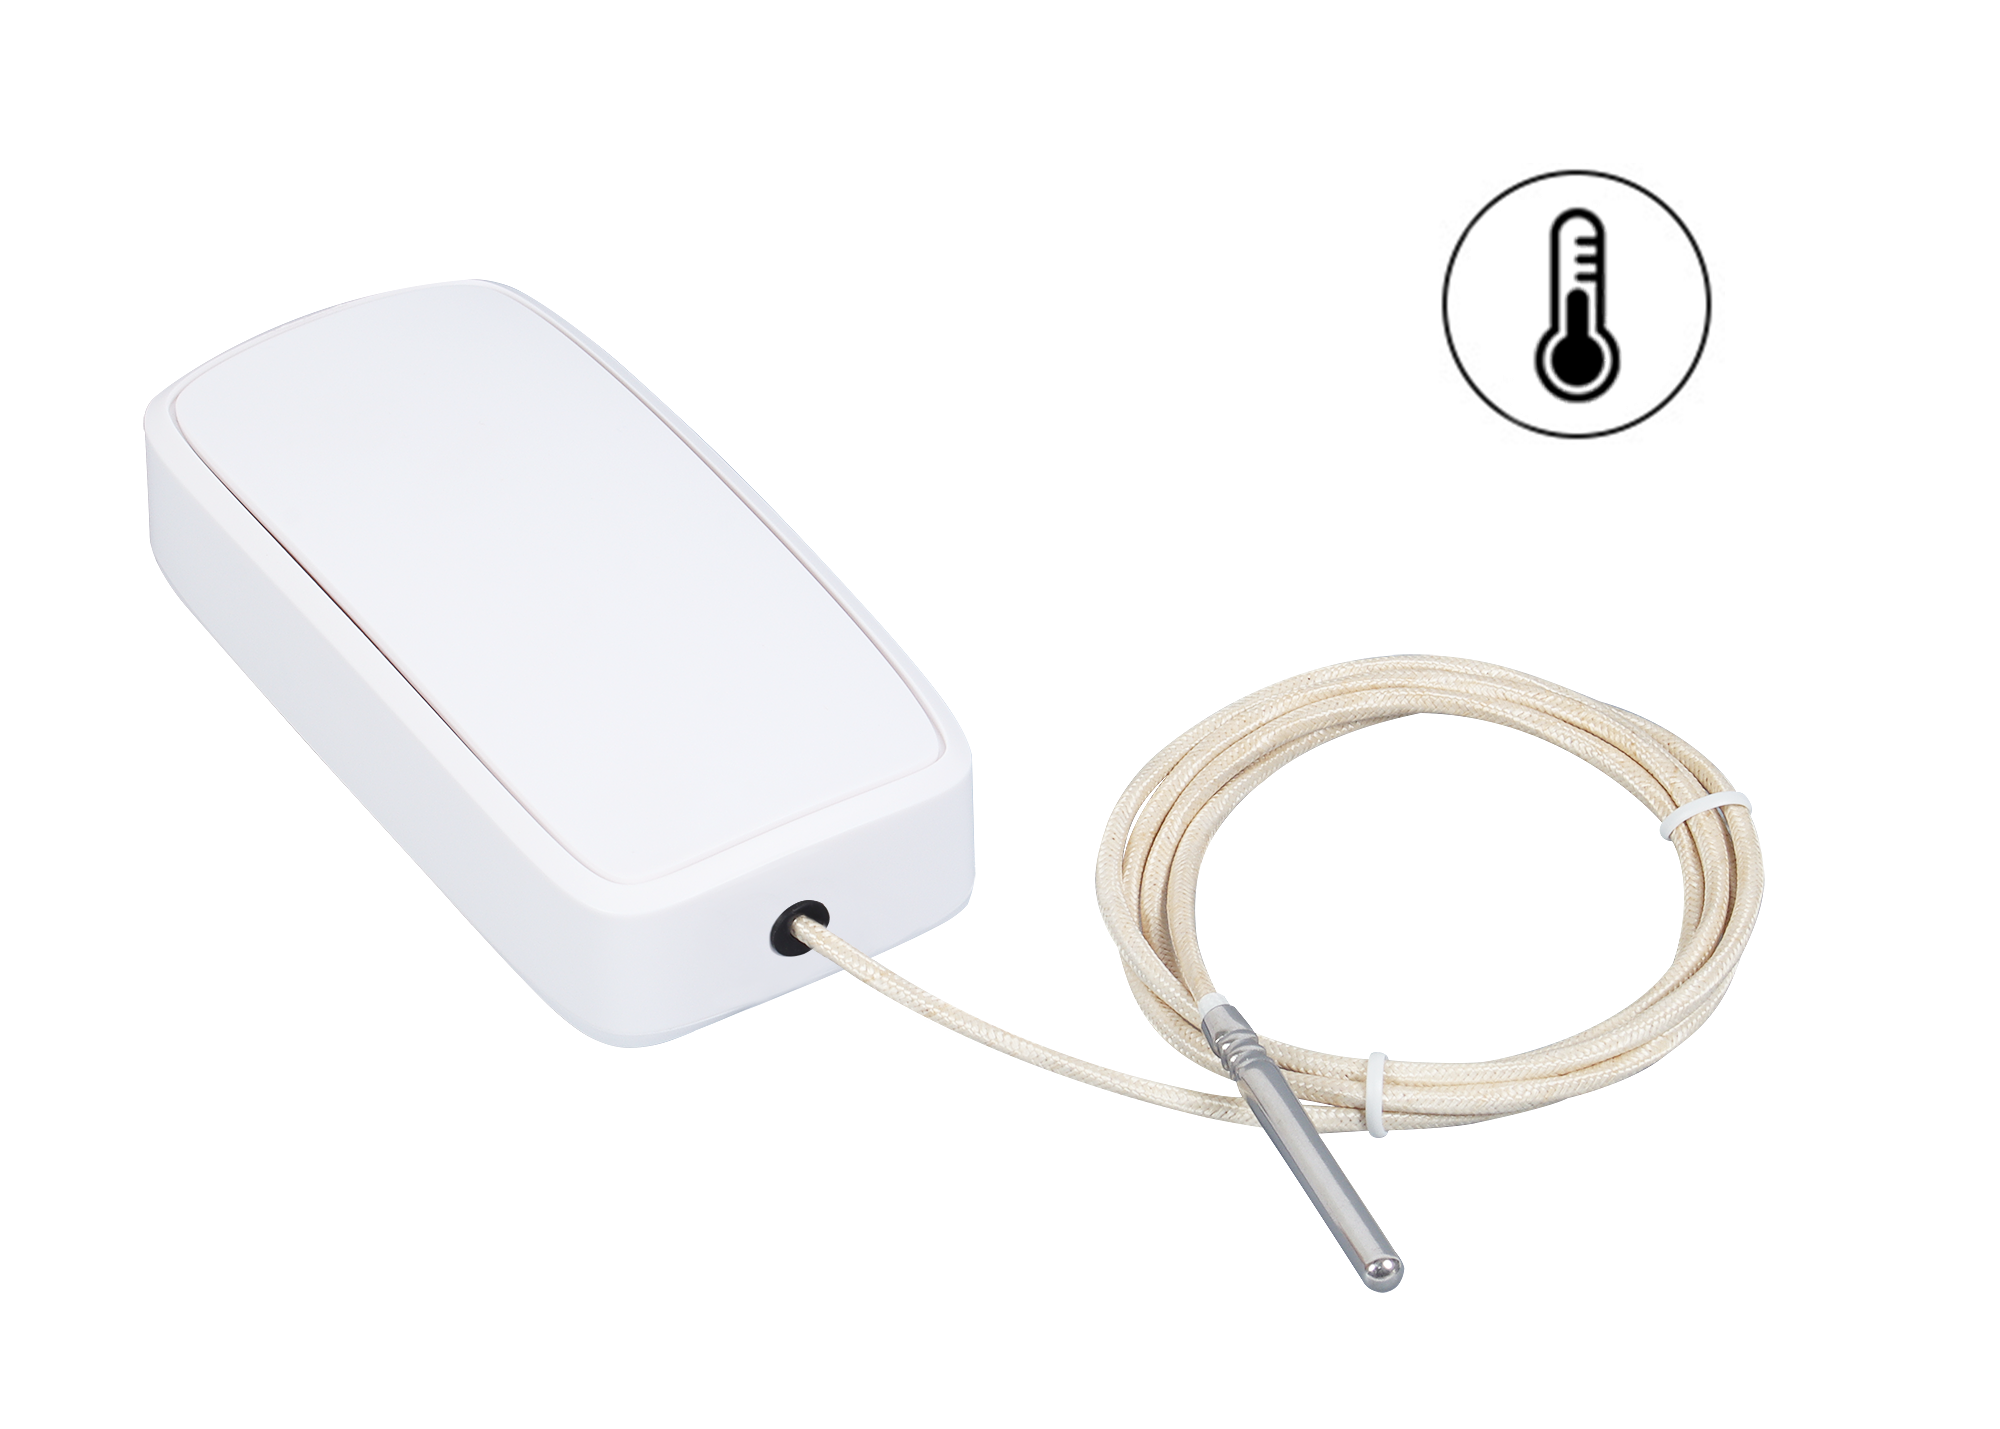
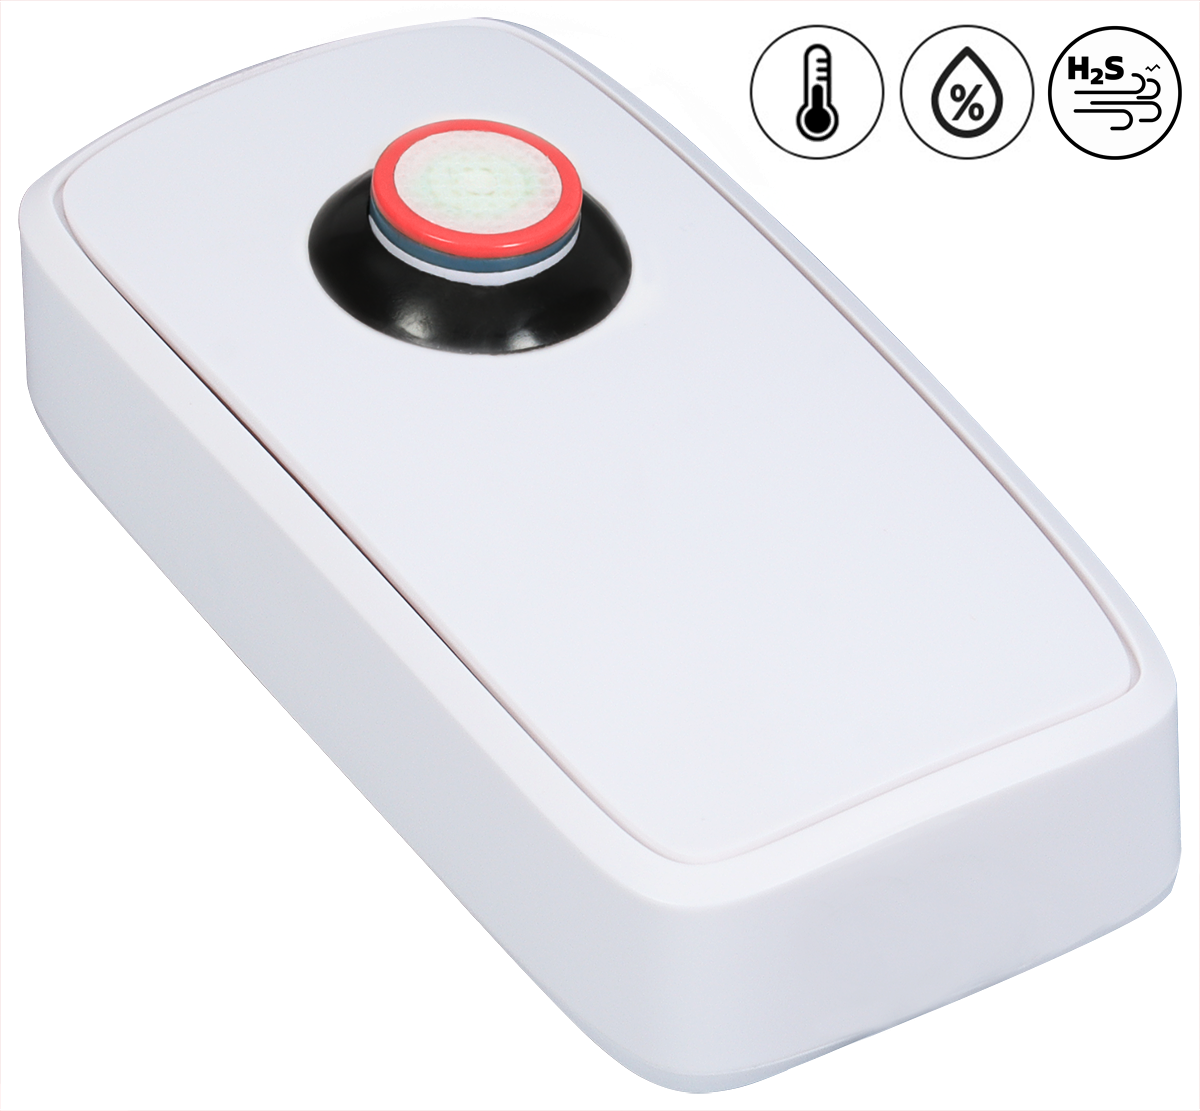
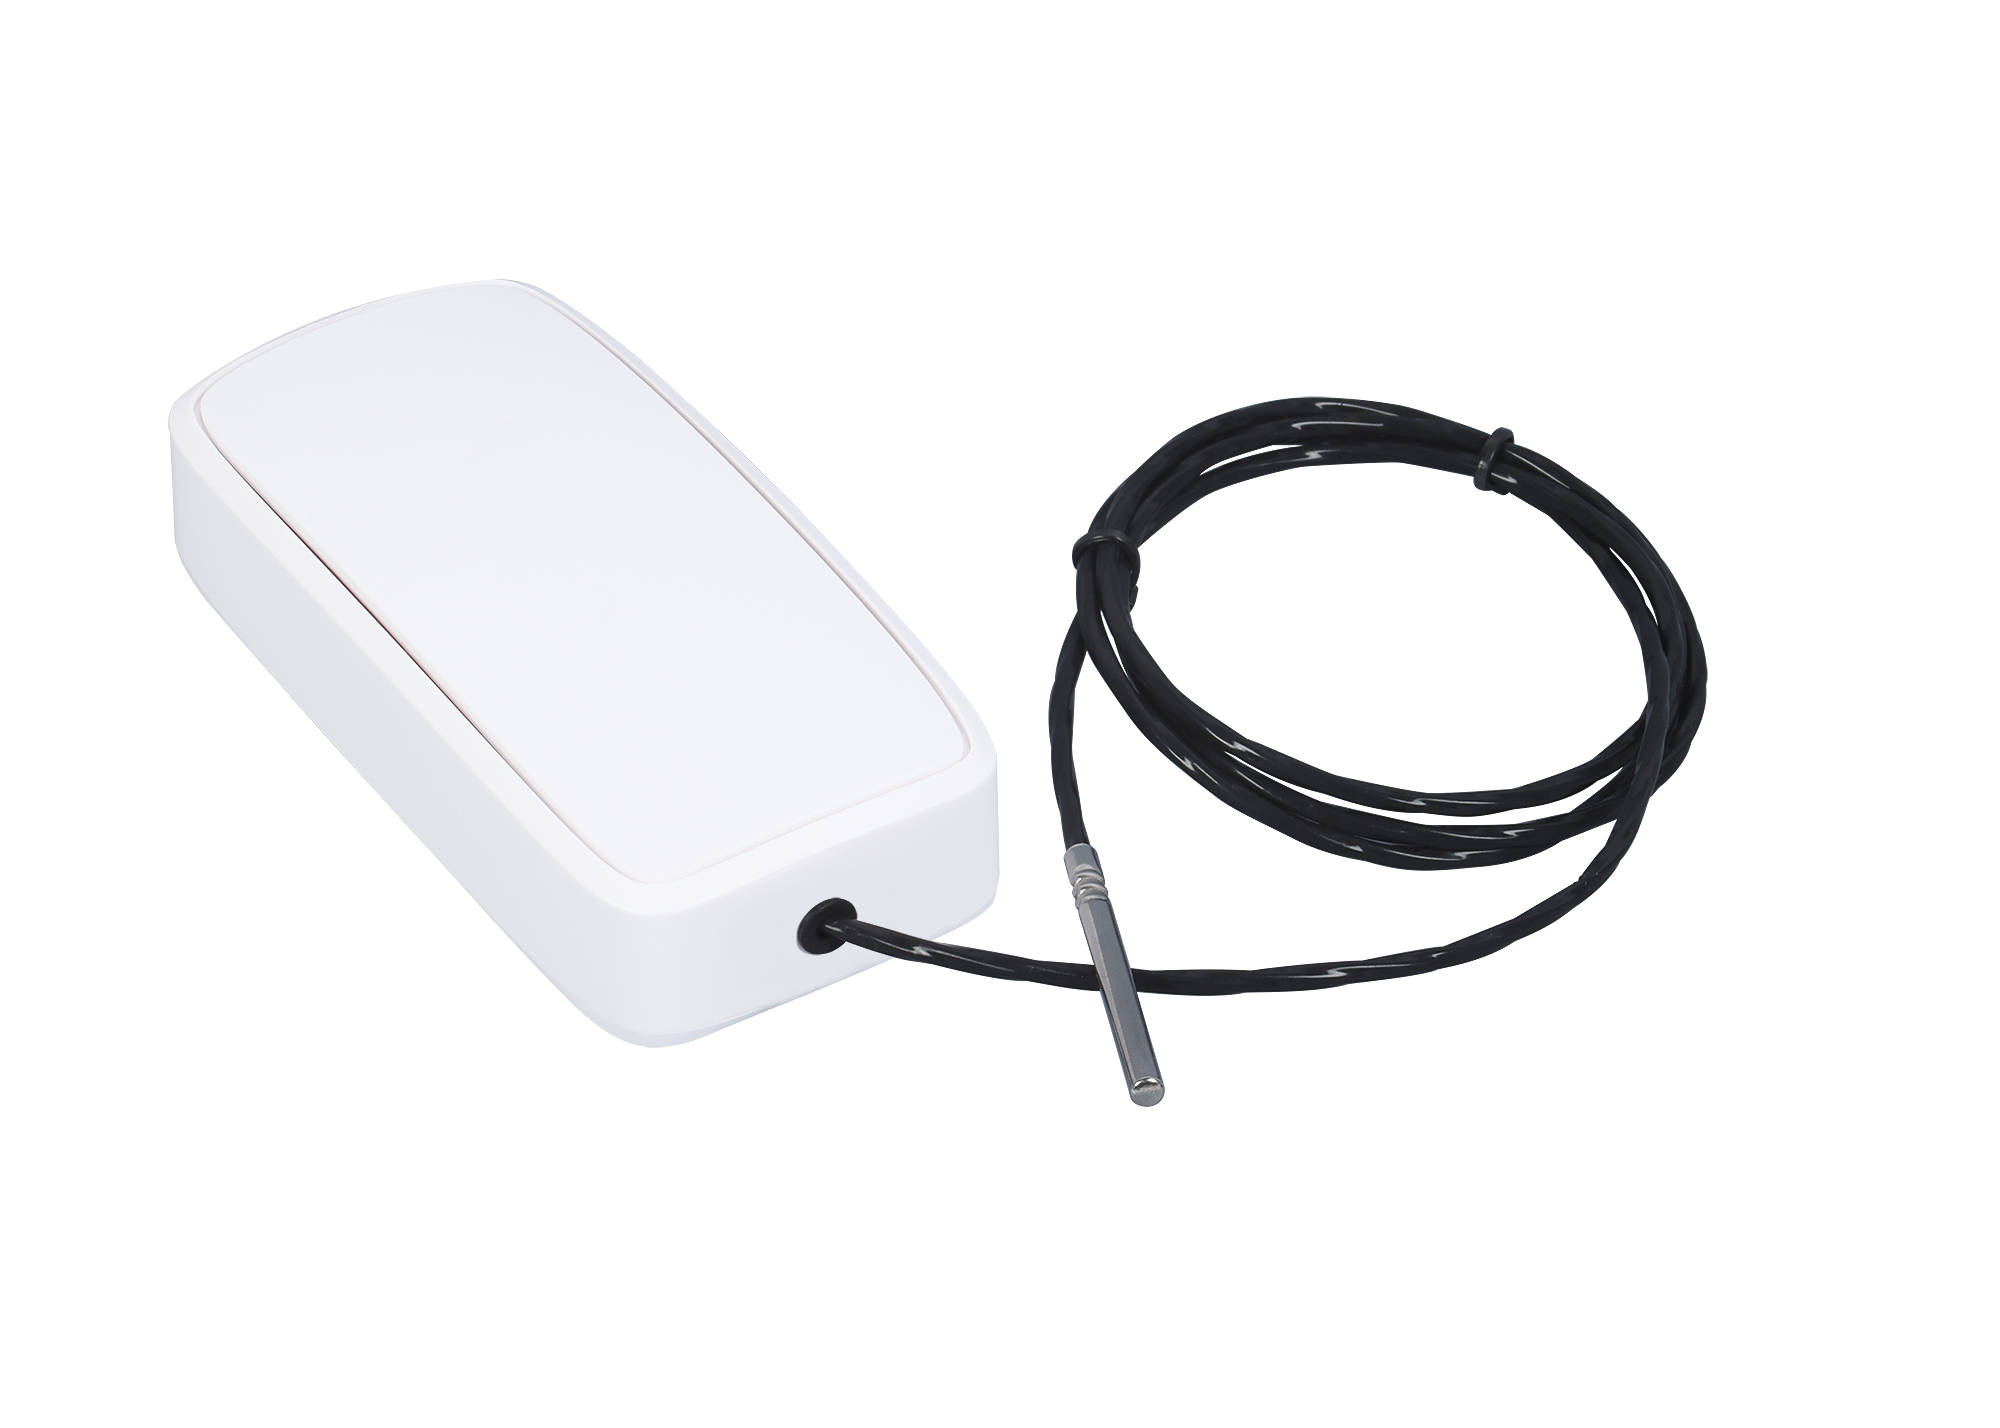
- Efento NB-IoT sensors
- Proto files used to deserialise the data coming from the sensors. You can download them from here
PostgreSQL database
After downloading and installing PostgreSQL you will need to create the first database. This is one of the steps during the PostgreSQL installation. By default, the database will be created with the following credentials:
DATABASE_HOST = ‘localhost’;
DATABASE_USER = ‘postgres’;
DATABASE_PASSWORD = ‘Your password’;
DATABASE_NAME = ‘postgres’;
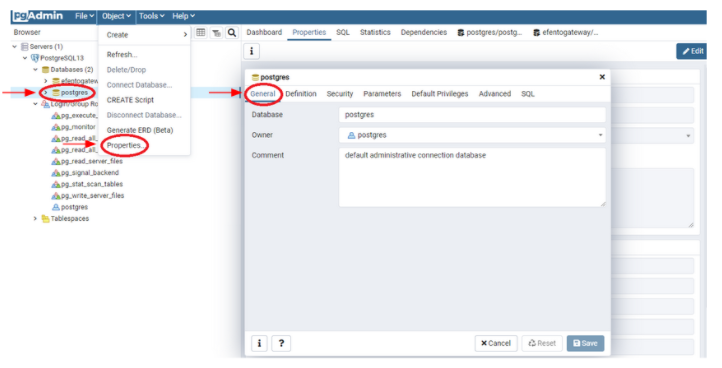
If you want to, you can change the names / credentials. Write them down, as they will be needed in the next steps. If you want to check database credentials, open pgAdmin in the PostgreSQL folder. Next open Object -> Properties -> General
Create table
To save the measurements coming from Efento Gateway in your database, you need to create a table. In this example, we are creating a very simple table to store all the data from the sensors, no matter what the sensor type. The table will have 5 columns, all of them of “text” type. Please note that this architecture of the database is only for the demonstration purposes. Database structure should be selected according to your project requirements.
You can create the table manually, using pgAdmin’s interface or using a SQL query. In pgAdmin select your database, open Tools menu: Tools -> Query Tools. Copy the request below into the Query Editor and click Execute (▶) :
CREATE TABLE  measurements (
    measured_at text ,
    serial_number text ,
    battery_ok  text ,
    type text,
    value text);
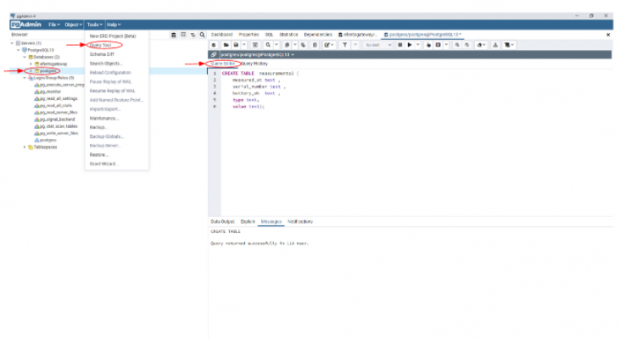
CREATE TABLE will create a new, initially empty table in the current database. The table will be owned by the user issuing the command.
CoAP Server
Before you start
The script uses a bunch of libraries. Before you start, you will need to download and install the following libraries:
- psycopg2 – Psycopg is the most popular PostgreSQL database adapter for the Python programming language. If you want to know more check project’s website
- aiocoap – The aiocoap package is an implementation of CoAP, the Constrained Application Protocol. It is written in Python 3 using its native asyncio methods to facilitate concurrent operations while maintaining an easy to use interface. If you want to know more about aiocoap check project’s website
- asyncio – asyncio is a library to write concurrent code using the async/await syntax. asyncio is used as a foundation for multiple Python asynchronous frameworks that provide high-performance network and web-servers, database connection libraries, distributed task queues, etc. If you want to know more about asyncio check project’s website
- protobuf – is a free and open source cross-platform library used to serialize structured data. It is useful in developing programs to communicate with each other over a network or for storing data.
- base64 – This module provides functions for encoding binary data to printable ASCII characters and decoding such encodings back to binary data. It provides encoding and decoding functions for the encodings specified in RFC 3548, which defines the Base16, Base32, and Base64 algorithms, and for the de-facto standard Ascii85 and Base85 encodings.
- datetime – The datetime module supplies classes for manipulating dates and times.
Compiling Protocol Buffers
Protocol buffers (or Protobuf) are a method of serializing the data that can be transmitted between microservices, applications or used in communication between IoT devices and servers. Protocol Buffers have the same function as well known and widely used JSON and XML. Like JSON and XML, the Protobufs are language-neutral and platform-neutral. Moreover, Protobuf is optimised to be fast and use as little network bandwidth as possible by minimizing the size of transmitted data. This makes Protobuf a perfect choice for serializing the data sent by the battery powered IoT devices.
Unlike JSON and XML, the data and context are separated in Protobuf. Context is defined in the configuration files called proto files (.proto). These files contain field names along with their types and identifiers (eg. string first_name = 1; string surname = 2;), based on the configuration fields Protobuf data is being serialized. The proto files can be compiled to generate code in the user’s selected programming language – a class with setters and getters for all the fields defined in the proto file. Currently, Google provides a code generator for multiple languages including C++, C#, Dart, Go, Java and Python under an open source license.
In order to compile the proto file to a Python class, you will require a protobuf compiler. If you don’t have the compiler yet, download the compiler from its official Github repository. You need to download the compiler dedicated for the operating system you are using (eg. for Windows download protoc-21.7-win64.zip and unzip it).
Once you have the protbuf compiler, download the proto files, unzip the folder and place the files in the same directory as the protobuf compiler (if you are using Windows …/protoc-21.7-win64/bin/). Run the protocol buffer compiler protoc on your .proto files – open a terminal window and enter:
protoc --python_out=.. proto_measurement_types.proto
protoc --python_out=.. proto_measurements.proto
protoc --python_out=.. proto_device_info.proto
protoc --python_out=.. proto_config.proto
protoc --python_out=.. proto_rule.proto
This will generate:
- “proto_measurement_types_pb2.py”,
- “proto_measurements_pb2.py”,
- “proto_device_info_pb2.py”,
- “proto_config_pb2.py”
- “proto_rule_pb2.py”
in your specified destination directory. Move the files to your project directory (your_python_project/protos/protos_files). Note! The repository with the sample code already contains classes resulting from compiling the proto files. If you use the sample code, you can skip this step.
NB-IoT sensor configuration
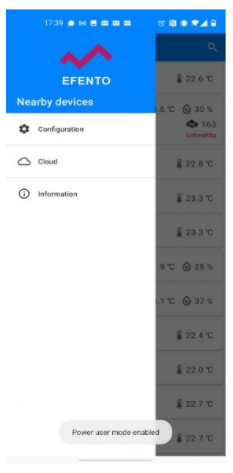
Configuration of Efento sensors is done with a free mobile application for Android. Application can be downloaded from Google Play. Once you download and install the application select “Nearby sensors” mode and unlock the power user mode: open the application menu and quickly tap the Efento logo five times.
Before you start the configuration, make sure the sensor is able to register in the NB-IoT network and the APN settings are right and the APN you use allows the device to connect to the server. Detailed user manual of Efento NB-IoT sensors and Efento mobile application can be found in the support section of our website.
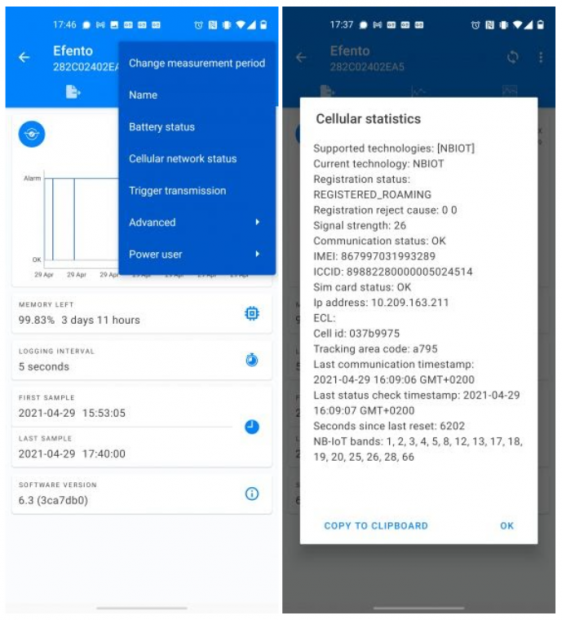
Using the mobile application, connect to the sensor -> click on the menu (three dots in the upper right corner) -> Cellular network status. Mare sure that the field “Registration status” value is either “REGISTERED” or “REGISTERED_ROAMING”
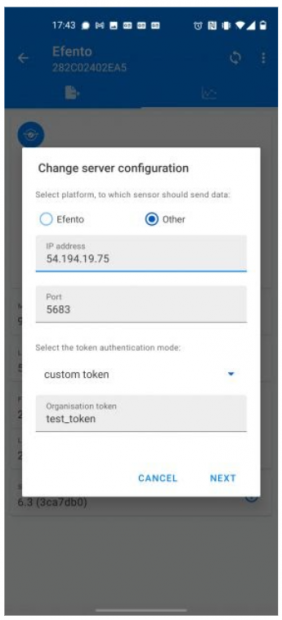
Set the sensor to send the data to your server. Connect to the sensor -> click on the menu (three dots in the upper right corner) -> Power user -> Server configuration. Select “Other” and fill in the IP address / domain and the port of the server. Note! The IP address used for setting up the CoAP server must be a static, public IP. If you are running the script on your computer, make sure you set the port forwarding on your router right.
Python code
The code written in Python is an example of the server that listens to the data sent by sensors, saves it in the data base and sends response to the sensors. The code can be downloaded from Efento’s GitHub repository
Results
When you run the script, all the data coming from the sensor will be saved in the database. To view the measurements open pgAdmin 4, select your database, then open Tools > Query Tools.
Enter the request below into the Query Editor and select Execute (▶) :
SELECT * FROM measurements;
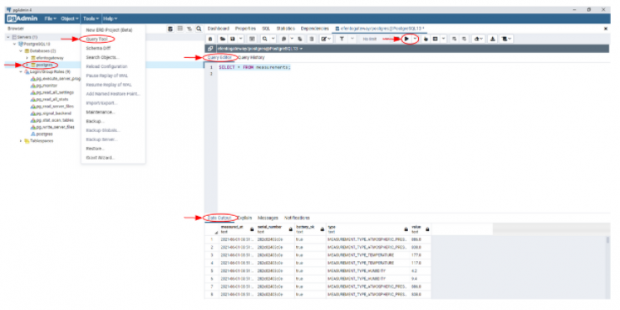
Data coming from Efento NB-IoT sensor is saved in the database
Two way communication
All parameters of Efento NB-IoT sensors can be changed remotely, from a server. The new configurations or server requests are sent in the responses (ACK) to the messages sent by the sensor.
We are going to modify the script from the example above to add a “device info” request sent from the server to the sensor. Device info is used by the sensor to send detailed information about the sensor’s operations and radio-related statistics to the server. In order to increase the battery lifetime, this information is sent by the sensor only at the server’s request. The server can request “device info” by sending a proper flag in the response to any of the sensor’s confirmable message. Once the server receives the device info frame from the sensor, it will parse it and log to a file.
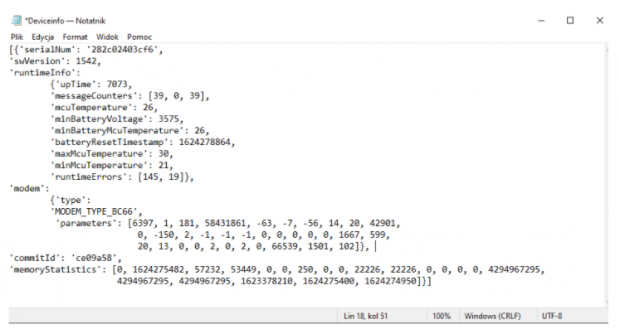
Device info message sent by Efento sensor contains information about:
- serial number,
- software version and commit ID,
- runtime information:
- uptime,
- number of messages sent,
- processor temperature,
- the lowest battery voltage,
- processor temperature during the lowest battery voltage,
- battery reset timestamp,
- max processor temperature,
- min processor temperature,
- runtime errors,
- modem information:
- modemy type and version,
- network / signal related parameters (CMSA, CMSA, NCMSA, MSS, SP, TP, TxP, C.ID, ECL, SNR, EARFCN, PCI, RSRQ, UPLINK, DOWNLINK),
- memory usage statistics,
How does it work?
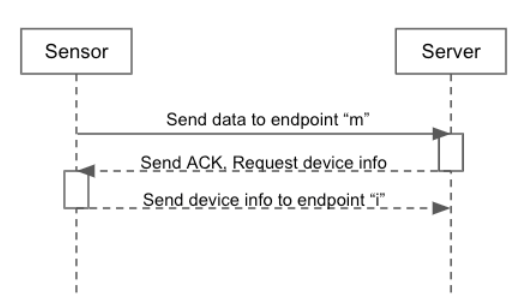
The CoAP server is constantly listening for data sent by Efento NB-IoT sensors. Once a new message arrives, the server parses the data, saves it in the PostgreSQL database and responds to the sensor with request device info and confirmation that the message has been received (code 2.01 “CREATED”). The response sent by the server will also contain a “Device info flag” – once the sensor receives it, it will send a second message with the detailed statistics (device info). The same approach can be applied to change the sensor’s settings.
Python code
The code that handles two way communication with the sensors can can be downloaded from Efento’s GitHub repository
Results
When you run the script, all the data coming from the sensor will be saved in the database. To view the measurements open pgAdmin 4, select your database, then open Tools > Query Tools.
Enter the request below into the Query Editor and select Execute (▶) :
SELECT * FROM measurements;
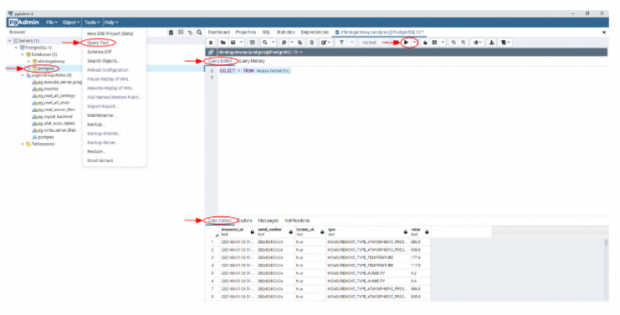
On top of that, after each confirmable message, the sensor will send a “Device Info” message which will be saved in the “Deviceinfo.txt” file